Computer use
Build a computer-using agent that can perform tasks on your behalf.
Overview
Computer use is a practical application of our Computer-Using Agent (CUA) model, computer-use-preview, which combines the vision capabilities of GPT-4o with advanced reasoning to simulate controlling computer interfaces and performing tasks.
Computer use is available through the Responses API. It is not available on Chat Completions.
Computer use is in beta. Because the model is still in preview and may be susceptible to exploits and inadvertent mistakes, we discourage trusting it in fully authenticated environments or for high-stakes tasks. See limitations and risk and safety best practices below. You must use the Computer Use tool in line with OpenAI's Usage Policy and Business Terms.
How it works
The computer use tool operates in a continuous loop. It sends computer actions, like click(x,y) or type(text), which your code executes on a computer or browser environment and then returns screenshots of the outcomes back to the model.
In this way, your code simulates the actions of a human using a computer interface, while our model uses the screenshots to understand the state of the environment and suggest next actions.
This loop lets you automate many tasks requiring clicking, typing, scrolling, and more. For example, booking a flight, searching for a product, or filling out a form.
Refer to the integration section below for more details on how to integrate the computer use tool, or check out our sample app repository to set up an environment and try example integrations.
[
CUA sample app
Examples of how to integrate the computer use tool in different environments
](https://github.com/openai/openai-cua-sample-app)
Setting up your environment
Before integrating the tool, prepare an environment that can capture screenshots and execute the recommended actions. We recommend using a sandboxed environment for safety reasons.
In this guide, we'll show you examples using either a local browsing environment or a local virtual machine, but there are more example computer environments in our sample app.
Set up a local browsing environment
If you want to try out the computer use tool with minimal setup, you can use a browser automation framework such as Playwright or Selenium.
Running a browser automation framework locally can pose security risks. We recommend the following setup to mitigate them:
- Use a sandboxed environment
- Set
envto an empty object to avoid exposing host environment variables to the browser - Set flags to disable extensions and the file system
Start a browser instance
You can start browser instances using your preferred language by installing the corresponding SDK.
For example, to start a Playwright browser instance, install the Playwright SDK:
- Python:
pip install playwright - JavaScript:
npm i playwrightthennpx playwright install
Then run the following code:
Start a browser instance
import { chromium } from "playwright";

const browser = await chromium.launch({
  headless: false,
  chromiumSandbox: true,
  env: {},
  args: ["--disable-extensions", "--disable-file-system"],
});
const page = await browser.newPage();
await page.setViewportSize({ width: 1024, height: 768 });
await page.goto("https://bing.com");

await page.waitForTimeout(10000);

browser.close();from playwright.sync_api import sync_playwright
with sync_playwright() as p:
browser = p.chromium.launch(
headless=False,
chromium_sandbox=True,
env={},
args=[
"--disable-extensions",
"--disable-file-system"
]
)
page = browser.new_page()
page.set_viewport_size({"width": 1024, "height": 768})
page.goto("https://bing.com")
page.wait_for_timeout(10000)Set up a local virtual machine
If you'd like to use the computer use tool beyond just a browser interface, you can set up a local virtual machine instead, using a tool like Docker. You can then connect to this local machine to execute computer use actions.
Start Docker
If you don't have Docker installed, you can install it from their website. Once installed, make sure Docker is running on your machine.
Create a Dockerfile
Create a Dockerfile to define the configuration of your virtual machine.
Here is an example Dockerfile that starts an Ubuntu virtual machine with a VNC server:
Dockerfile
FROM ubuntu:22.04
ENV DEBIAN_FRONTEND=noninteractive

# 1) Install Xfce, x11vnc, Xvfb, xdotool, etc., but remove any screen lockers or power managers
RUN apt-get update && apt-get install -y     xfce4     xfce4-goodies     x11vnc     xvfb     xdotool     imagemagick     x11-apps     sudo     software-properties-common     imagemagick  && apt-get remove -y light-locker xfce4-screensaver xfce4-power-manager || true  && apt-get clean && rm -rf /var/lib/apt/lists/*

# 2) Add the mozillateam PPA and install Firefox ESR
RUN add-apt-repository ppa:mozillateam/ppa  && apt-get update  && apt-get install -y --no-install-recommends firefox-esr  && update-alternatives --set x-www-browser /usr/bin/firefox-esr  && apt-get clean && rm -rf /var/lib/apt/lists/*

# 3) Create non-root user
RUN useradd -ms /bin/bash myuser     && echo "myuser ALL=(ALL) NOPASSWD:ALL" >> /etc/sudoers
USER myuser
WORKDIR /home/myuser

# 4) Set x11vnc password ("secret")
RUN x11vnc -storepasswd secret /home/myuser/.vncpass

# 5) Expose port 5900 and run Xvfb, x11vnc, Xfce (no login manager)
EXPOSE 5900
CMD ["/bin/sh", "-c", "    Xvfb :99 -screen 0 1280x800x24 >/dev/null 2>&1 &     x11vnc -display :99 -forever -rfbauth /home/myuser/.vncpass -listen 0.0.0.0 -rfbport 5900 >/dev/null 2>&1 &     export DISPLAY=:99 &&     startxfce4 >/dev/null 2>&1 &     sleep 2 && echo 'Container running!' &&     tail -f /dev/null "]
Build the Docker image
Build the Docker image by running the following command in the directory containing the Dockerfile:
docker build -t cua-image .Run the Docker container locally
Start the Docker container with the following command:
docker run --rm -it --name cua-image -p 5900:5900 -e DISPLAY=:99 cua-imageExecute commands on the container
Now that your container is running, you can execute commands on it. For example, we can define a helper function to execute commands on the container that will be used in the next steps.
Execute commands on the container
def docker_exec(cmd: str, container_name: str, decode=True) -> str:
    safe_cmd = cmd.replace('"', '\"')
    docker_cmd = f'docker exec {container_name} sh -c "{safe_cmd}"'
    output = subprocess.check_output(docker_cmd, shell=True)
    if decode:
        return output.decode("utf-8", errors="ignore")
    return output

class VM:
    def __init__(self, display, container_name):
        self.display = display
        self.container_name = container_name

vm = VM(display=":99", container_name="cua-image")async function dockerExec(cmd, containerName, decode = true) {
const safeCmd = cmd.replace(/"/g, '\"');
const dockerCmd = `docker exec ${containerName} sh -c "${safeCmd}"`;
const output = await execAsync(dockerCmd, {
encoding: decode ? "utf8" : "buffer",
});
const result = output && output.stdout ? output.stdout : output;
if (decode) {
return result.toString("utf-8");
}
return result;
}
const vm = {
display: ":99",
containerName: "cua-image",
};Integrating the CUA loop
These are the high-level steps you need to follow to integrate the computer use tool in your application:
Send a request to the model: Include the
computertool as part of the available tools, specifying the display size and environment. You can also include in the first request a screenshot of the initial state of the environment.Receive a response from the model: Check if the response has any
computer_callitems. This tool call contains a suggested action to take to progress towards the specified goal. These actions could be clicking at a given position, typing in text, scrolling, or even waiting.Execute the requested action: Execute through code the corresponding action on your computer or browser environment.
Capture the updated state: After executing the action, capture the updated state of the environment as a screenshot.
Repeat: Send a new request with the updated state as a
computer_call_output, and repeat this loop until the model stops requesting actions or you decide to stop.
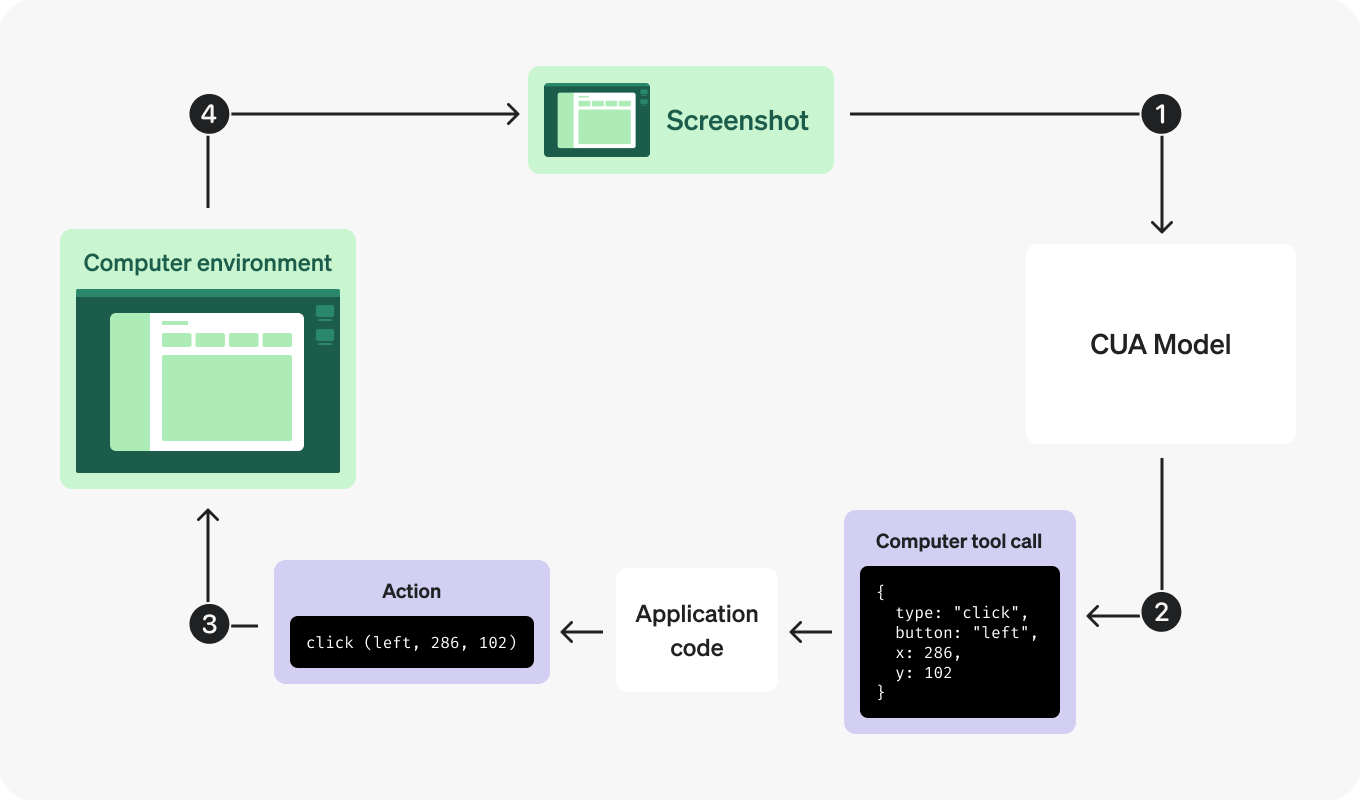
1. Send a request to the model
Send a request to create a Response with the computer-use-preview model equipped with the computer_use_preview tool. This request should include details about your environment, along with an initial input prompt.
If you want to show a summary of the reasoning performed by the model, you can include the summary parameter in the request. This can be helpful if you want to debug or show what's happening behind the scenes in your interface. The summary can either be concise or detailed.
Optionally, you can include a screenshot of the initial state of the environment.
To be able to use the computer_use_preview tool, you need to set the truncation parameter to "auto" (by default, truncation is disabled).
Send a CUA request
import OpenAI from "openai";
const openai = new OpenAI();

const response = await openai.responses.create({
  model: "computer-use-preview",
  tools: [
    {
      type: "computer_use_preview",
      display_width: 1024,
      display_height: 768,
      environment: "browser", // other possible values: "mac", "windows", "ubuntu"
    },
  ],
  input: [
    {
      role: "user",
      content: [
        {
          type: "text",
          text: "Check the latest OpenAI news on bing.com.",
        },
        // Optional: include a screenshot of the initial state of the environment
        // {
        //     type: "input_image",
        //     image_url: `data:image/png;base64,${screenshot_base64}`
        // }
      ],
    },
  ],
  reasoning: {
    summary: "concise",
  },
  truncation: "auto",
});

console.log(JSON.stringify(response.output, null, 2));from openai import OpenAI
client = OpenAI()
response = client.responses.create(
model="computer-use-preview",
tools=[{
"type": "computer_use_preview",
"display_width": 1024,
"display_height": 768,
"environment": "browser" # other possible values: "mac", "windows", "ubuntu"
}],
input=[
{
"role": "user",
"content": [
{
"type": "text",
"text": "Check the latest OpenAI news on bing.com."
}
# Optional: include a screenshot of the initial state of the environment
# {
# type: "input_image",
# image_url: f"data:image/png;base64,{screenshot_base64}"
# }
]
}
],
reasoning={
"summary": "concise",
},
truncation="auto"
)
print(response.output)2. Receive a suggested action
The model returns an output that contains either a computer_call item, just text, or other tool calls, depending on the state of the conversation.
Examples of computer_call items are a click, a scroll, a key press, or any other event defined in the API reference. In our example, the item is a click action:
CUA suggested action
"output": [
    {
        "type": "reasoning",
        "id": "rs_67cc...",
        "summary": [
            {
                "type": "summary_text",
                "text": "Clicking on the browser address bar."
            }
        ]
    },
    {
        "type": "computer_call",
        "id": "cu_67cc...",
        "call_id": "call_zw3...",
        "action": {
            "type": "click",
            "button": "left",
            "x": 156,
            "y": 50
        },
        "pending_safety_checks": [],
        "status": "completed"
    }
]
Reasoning items
The model may return a reasoning item in the response output for some actions. If you don't use the previous_response_id parameter as shown in Step 5 and manage the inputs array on your end, make sure to include those reasoning items along with the computer calls when sending the next request to the CUA model–or the request will fail.
The reasoning items are only compatible with the same model that produced them (in this case, computer-use-preview). If you implement a flow where you use several models with the same conversation history, you should filter these reasoning items out of the inputs array you send to other models.
Safety checks
The model may return safety checks with the pending_safety_check parameter. Refer to the section on how to acknowledge safety checks below for more details.
3. Execute the action in your environment
Execute the corresponding actions on your computer or browser. How you map a computer call to actions through code depends on your environment. This code shows example implementations for the most common computer actions.
Playwright
Execute the action
async function handleModelAction(page, action) {
  // Given a computer action (e.g., click, double_click, scroll, etc.),
  // execute the corresponding operation on the Playwright page.

  const actionType = action.type;

  try {
    switch (actionType) {
      case "click": {
        const { x, y, button = "left" } = action;
        console.log(`Action: click at (${x}, ${y}) with button '${button}'`);
        await page.mouse.click(x, y, { button });
        break;
      }

      case "scroll": {
        const { x, y, scrollX, scrollY } = action;
        console.log(
          `Action: scroll at (${x}, ${y}) with offsets (scrollX=${scrollX}, scrollY=${scrollY})`
        );
        await page.mouse.move(x, y);
        await page.evaluate(`window.scrollBy(${scrollX}, ${scrollY})`);
        break;
      }

      case "keypress": {
        const { keys } = action;
        for (const k of keys) {
          console.log(`Action: keypress '${k}'`);
          // A simple mapping for common keys; expand as needed.
          if (k.includes("ENTER")) {
            await page.keyboard.press("Enter");
          } else if (k.includes("SPACE")) {
            await page.keyboard.press(" ");
          } else {
            await page.keyboard.press(k);
          }
        }
        break;
      }

      case "type": {
        const { text } = action;
        console.log(`Action: type text '${text}'`);
        await page.keyboard.type(text);
        break;
      }

      case "wait": {
        console.log(`Action: wait`);
        await page.waitForTimeout(2000);
        break;
      }

      case "screenshot": {
        // Nothing to do as screenshot is taken at each turn
        console.log(`Action: screenshot`);
        break;
      }

      // Handle other actions here

      default:
        console.log("Unrecognized action:", action);
    }
  } catch (e) {
    console.error("Error handling action", action, ":", e);
  }
}def handle_model_action(page, action):
"""
Given a computer action (e.g., click, double_click, scroll, etc.),
execute the corresponding operation on the Playwright page.
"""
action_type = action.type
try:
match action_type:
case "click":
x, y = action.x, action.y
button = action.button
print(f"Action: click at ({x}, {y}) with button '{button}'")
# Not handling things like middle click, etc.
if button != "left" and button != "right":
button = "left"
page.mouse.click(x, y, button=button)
case "scroll":
x, y = action.x, action.y
scroll_x, scroll_y = action.scroll_x, action.scroll_y
print(f"Action: scroll at ({x}, {y}) with offsets (scroll_x={scroll_x}, scroll_y={scroll_y})")
page.mouse.move(x, y)
page.evaluate(f"window.scrollBy({scroll_x}, {scroll_y})")
case "keypress":
keys = action.keys
for k in keys:
print(f"Action: keypress '{k}'")
# A simple mapping for common keys; expand as needed.
if k.lower() == "enter":
page.keyboard.press("Enter")
elif k.lower() == "space":
page.keyboard.press(" ")
else:
page.keyboard.press(k)
case "type":
text = action.text
print(f"Action: type text: {text}")
page.keyboard.type(text)
case "wait":
print(f"Action: wait")
time.sleep(2)
case "screenshot":
# Nothing to do as screenshot is taken at each turn
print(f"Action: screenshot")
# Handle other actions here
case _:
print(f"Unrecognized action: {action}")
except Exception as e:
print(f"Error handling action {action}: {e}")Docker
Execute the action
async function handleModelAction(vm, action) {
    // Given a computer action (e.g., click, double_click, scroll, etc.),
    // execute the corresponding operation on the Docker environment.

    const actionType = action.type;

    try {
      switch (actionType) {
        case "click": {
          const { x, y, button = "left" } = action;
          const buttonMap = { left: 1, middle: 2, right: 3 };
          const b = buttonMap[button] || 1;
          console.log(`Action: click at (${x}, ${y}) with button '${button}'`);
          await dockerExec(
            `DISPLAY=${vm.display} xdotool mousemove ${x} ${y} click ${b}`,
            vm.containerName
          );
          break;
        }

        case "scroll": {
          const { x, y, scrollX, scrollY } = action;
          console.log(
            `Action: scroll at (${x}, ${y}) with offsets (scrollX=${scrollX}, scrollY=${scrollY})`
          );
          await dockerExec(
            `DISPLAY=${vm.display} xdotool mousemove ${x} ${y}`,
            vm.containerName
          );
          // For vertical scrolling, use button 4 for scroll up and button 5 for scroll down.
          if (scrollY !== 0) {
            const button = scrollY < 0 ? 4 : 5;
            const clicks = Math.abs(scrollY);
            for (let i = 0; i < clicks; i++) {
              await dockerExec(
                `DISPLAY=${vm.display} xdotool click ${button}`,
                vm.containerName
              );
            }
          }
          break;
        }

        case "keypress": {
          const { keys } = action;
          for (const k of keys) {
            console.log(`Action: keypress '${k}'`);
            // A simple mapping for common keys; expand as needed.
            if (k.includes("ENTER")) {
              await dockerExec(
                `DISPLAY=${vm.display} xdotool key 'Return'`,
                vm.containerName
              );
            } else if (k.includes("SPACE")) {
              await dockerExec(
                `DISPLAY=${vm.display} xdotool key 'space'`,
                vm.containerName
              );
            } else {
              await dockerExec(
                `DISPLAY=${vm.display} xdotool key '${k}'`,
                vm.containerName
              );
            }
          }
          break;
        }

        case "type": {
          const { text } = action;
          console.log(`Action: type text '${text}'`);
          await dockerExec(
            `DISPLAY=${vm.display} xdotool type '${text}'`,
            vm.containerName
          );
          break;
        }

        case "wait": {
          console.log(`Action: wait`);
          await new Promise((resolve) => setTimeout(resolve, 2000));
          break;
        }

        case "screenshot": {
          // Nothing to do as screenshot is taken at each turn
          console.log(`Action: screenshot`);
          break;
        }

        // Handle other actions here

        default:
          console.log("Unrecognized action:", action);
      }
    } catch (e) {
      console.error("Error handling action", action, ":", e);
    }
}def handle_model_action(vm, action):
"""
Given a computer action (e.g., click, double_click, scroll, etc.),
execute the corresponding operation on the Docker environment.
"""
action_type = action.type
try:
match action_type:
case "click":
x, y = int(action.x), int(action.y)
button_map = {"left": 1, "middle": 2, "right": 3}
b = button_map.get(action.button, 1)
print(f"Action: click at ({x}, {y}) with button '{action.button}'")
docker_exec(f"DISPLAY={vm.display} xdotool mousemove {x} {y} click {b}", vm.container_name)
case "scroll":
x, y = int(action.x), int(action.y)
scroll_x, scroll_y = int(action.scroll_x), int(action.scroll_y)
print(f"Action: scroll at ({x}, {y}) with offsets (scroll_x={scroll_x}, scroll_y={scroll_y})")
docker_exec(f"DISPLAY={vm.display} xdotool mousemove {x} {y}", vm.container_name)
# For vertical scrolling, use button 4 (scroll up) or button 5 (scroll down)
if scroll_y != 0:
button = 4 if scroll_y < 0 else 5
clicks = abs(scroll_y)
for _ in range(clicks):
docker_exec(f"DISPLAY={vm.display} xdotool click {button}", vm.container_name)
case "keypress":
keys = action.keys
for k in keys:
print(f"Action: keypress '{k}'")
# A simple mapping for common keys; expand as needed.
if k.lower() == "enter":
docker_exec(f"DISPLAY={vm.display} xdotool key 'Return'", vm.container_name)
elif k.lower() == "space":
docker_exec(f"DISPLAY={vm.display} xdotool key 'space'", vm.container_name)
else:
docker_exec(f"DISPLAY={vm.display} xdotool key '{k}'", vm.container_name)
case "type":
text = action.text
print(f"Action: type text: {text}")
docker_exec(f"DISPLAY={vm.display} xdotool type '{text}'", vm.container_name)
case "wait":
print(f"Action: wait")
time.sleep(2)
case "screenshot":
# Nothing to do as screenshot is taken at each turn
print(f"Action: screenshot")
# Handle other actions here
case _:
print(f"Unrecognized action: {action}")
except Exception as e:
print(f"Error handling action {action}: {e}")4. Capture the updated screenshot
After executing the action, capture the updated state of the environment as a screenshot, which also differs depending on your environment.
Playwright
Capture and send the updated screenshot
async function getScreenshot(page) {
    // Take a full-page screenshot using Playwright and return the image bytes.
    return await page.screenshot();
}def get_screenshot(page):
"""
Take a full-page screenshot using Playwright and return the image bytes.
"""
return page.screenshot()Docker
Capture and send the updated screenshot
async function getScreenshot(vm) {
  // Take a screenshot, returning raw bytes.
  const cmd = `export DISPLAY=${vm.display} && import -window root png:-`;
  const screenshotBuffer = await dockerExec(cmd, vm.containerName, false);
  return screenshotBuffer;
}def get_screenshot(vm):
"""
Takes a screenshot, returning raw bytes.
"""
cmd = (
f"export DISPLAY={vm.display} && "
"import -window root png:-"
)
screenshot_bytes = docker_exec(cmd, vm.container_name, decode=False)
return screenshot_bytes5. Repeat
Once you have the screenshot, you can send it back to the model as a computer_call_output to get the next action. Repeat these steps as long as you get a computer_call item in the response.
Repeat steps in a loop
import OpenAI from "openai";
const openai = new OpenAI();

async function computerUseLoop(instance, response) {
  /**
   * Run the loop that executes computer actions until no 'computer_call' is found.
   */
  while (true) {
    const computerCalls = response.output.filter(
      (item) => item.type === "computer_call"
    );
    if (computerCalls.length === 0) {
      console.log("No computer call found. Output from model:");
      response.output.forEach((item) => {
        console.log(JSON.stringify(item, null, 2));
      });
      break; // Exit when no computer calls are issued.
    }

    // We expect at most one computer call per response.
    const computerCall = computerCalls[0];
    const lastCallId = computerCall.call_id;
    const action = computerCall.action;

    // Execute the action (function defined in step 3)
    handleModelAction(instance, action);
    await new Promise((resolve) => setTimeout(resolve, 1000)); // Allow time for changes to take effect.

    // Take a screenshot after the action (function defined in step 4)
    const screenshotBytes = await getScreenshot(instance);
    const screenshotBase64 = Buffer.from(screenshotBytes).toString("base64");

    // Send the screenshot back as a computer_call_output
    response = await openai.responses.create({
      model: "computer-use-preview",
      previous_response_id: response.id,
      tools: [
        {
          type: "computer_use_preview",
          display_width: 1024,
          display_height: 768,
          environment: "browser",
        },
      ],
      input: [
        {
          call_id: lastCallId,
          type: "computer_call_output",
          output: {
            type: "input_image",
            image_url: `data:image/png;base64,${screenshotBase64}`,
          },
        },
      ],
      truncation: "auto",
    });
  }

  return response;
}import time
import base64
from openai import OpenAI
client = OpenAI()
def computer_use_loop(instance, response):
"""
Run the loop that executes computer actions until no 'computer_call' is found.
"""
while True:
computer_calls = [item for item in response.output if item.type == "computer_call"]
if not computer_calls:
print("No computer call found. Output from model:")
for item in response.output:
print(item)
break # Exit when no computer calls are issued.
# We expect at most one computer call per response.
computer_call = computer_calls[0]
last_call_id = computer_call.call_id
action = computer_call.action
# Execute the action (function defined in step 3)
handle_model_action(instance, action)
time.sleep(1) # Allow time for changes to take effect.
# Take a screenshot after the action (function defined in step 4)
screenshot_bytes = get_screenshot(instance)
screenshot_base64 = base64.b64encode(screenshot_bytes).decode("utf-8")
# Send the screenshot back as a computer_call_output
response = client.responses.create(
model="computer-use-preview",
previous_response_id=response.id,
tools=[
{
"type": "computer_use_preview",
"display_width": 1024,
"display_height": 768,
"environment": "browser"
}
],
input=[
{
"call_id": last_call_id,
"type": "computer_call_output",
"output": {
"type": "input_image",
"image_url": f"data:image/png;base64,{screenshot_base64}"
}
}
],
truncation="auto"
)
return responseHandling conversation history
You can use the previous_response_id parameter to link the current request to the previous response. We recommend using this method if you don't want to manage the conversation history on your side.
If you do not want to use this parameter, you should make sure to include in your inputs array all the items returned in the response output of the previous request, including reasoning items if present.
Acknowledge safety checks
We have implemented safety checks in the API to help protect against prompt injection and model mistakes. These checks include:
- Malicious instruction detection: we evaluate the screenshot image and check if it contains adversarial content that may change the model's behavior.
- Irrelevant domain detection: we evaluate the
current_url(if provided) and check if the current domain is considered relevant given the conversation history. - Sensitive domain detection: we check the
current_url(if provided) and raise a warning when we detect the user is on a sensitive domain.
If one or multiple of the above checks is triggered, a safety check is raised when the model returns the next computer_call, with the pending_safety_checks parameter.
Pending safety checks
"output": [
    {
        "type": "reasoning",
        "id": "rs_67cb...",
        "summary": [
            {
                "type": "summary_text",
                "text": "Exploring 'File' menu option."
            }
        ]
    },
    {
        "type": "computer_call",
        "id": "cu_67cb...",
        "call_id": "call_nEJ...",
        "action": {
            "type": "click",
            "button": "left",
            "x": 135,
            "y": 193
        },
        "pending_safety_checks": [
            {
                "id": "cu_sc_67cb...",
                "code": "malicious_instructions",
                "message": "We've detected instructions that may cause your application to perform malicious or unauthorized actions. Please acknowledge this warning if you'd like to proceed."
            }
        ],
        "status": "completed"
    }
]
You need to pass the safety checks back as acknowledged_safety_checks in the next request in order to proceed. In all cases where pending_safety_checks are returned, actions should be handed over to the end user to confirm model behavior and accuracy.
malicious_instructionsandirrelevant_domain: end users should review model actions and confirm that the model is behaving as intended.sensitive_domain: ensure an end user is actively monitoring the model actions on these sites. Exact implementation of this "watch mode" may vary by application, but a potential example could be collecting user impression data on the site to make sure there is active end user engagement with the application.
Acknowledge safety checks
from openai import OpenAI
client = OpenAI()

response = client.responses.create(
    model="computer-use-preview",
    previous_response_id="<previous_response_id>",
    tools=[{
        "type": "computer_use_preview",
        "display_width": 1024,
        "display_height": 768,
        "environment": "browser"
    }],
    input=[
        {
            "type": "computer_call_output",
            "call_id": "<call_id>",
            "acknowledged_safety_checks": [
                {
                    "id": "<safety_check_id>",
                    "code": "malicious_instructions",
                    "message": "We've detected instructions that may cause your application to perform malicious or unauthorized actions. Please acknowledge this warning if you'd like to proceed."
                }
            ],
            "output": {
                "type": "computer_screenshot",
                "image_url": "<image_url>"
            }
        }
    ],
    truncation="auto"
)import OpenAI from "openai";
const openai = new OpenAI();
const response = await openai.responses.create({
model: "computer-use-preview",
previous_response_id: "<previous_response_id>",
tools: [{
type: "computer_use_preview",
display_width: 1024,
display_height: 768,
environment: "browser"
}],
input: [
{
"type": "computer_call_output",
"call_id": "<call_id>",
"acknowledged_safety_checks": [
{
"id": "<safety_check_id>",
"code": "malicious_instructions",
"message": "We've detected instructions that may cause your application to perform malicious or unauthorized actions. Please acknowledge this warning if you'd like to proceed."
}
],
"output": {
"type": "computer_screenshot",
"image_url": "<image_url>"
}
}
],
truncation: "auto",
});Final code
Putting it all together, the final code should include:
- The initialization of the environment
- A first request to the model with the
computertool - A loop that executes the suggested action in your environment
- A way to acknowledge safety checks and give end users a chance to confirm actions
To see end-to-end example integrations, refer to our CUA sample app repository.
[
CUA sample app
Examples of how to integrate the computer use tool in different environments
](https://github.com/openai/openai-cua-sample-app)
Limitations
We recommend using the computer-use-preview model for browser-based tasks. The model may be susceptible to inadvertent model mistakes, especially in non-browser environments that it is less used to.
For example, computer-use-preview's performance on OSWorld is currently 38.1%, indicating that the model is not yet highly reliable for automating tasks on an OS. More details about the model and related safety work can be found in our updated system card.
Some other behavior limitations to be aware of:
- The
computer-use-previewmodel has constrained rate limits and feature support, described on its model detail page. - Refer to this guide for data retention, residency, and handling policies.
Risks and safety
Computer use presents unique risks that differ from those in standard API features or chat interfaces, especially when interacting with the internet.
There are a number of best practices listed below that you should follow to mitigate these risks.
Human in the loop for high-stakes tasks
Avoid tasks that are high-stakes or require high levels of accuracy. The model may make mistakes that are challenging to reverse. As mentioned above, the model is still prone to mistakes, especially on non-browser surfaces. While we expect the model to request user confirmation before proceeding with certain higher-impact decisions, this is not fully reliable. Ensure a human is in the loop to confirm model actions with real-world consequences.
Beware of prompt injections
A prompt injection occurs when an AI model mistakenly follows untrusted instructions appearing in its input. For the computer-use-preview model, this may manifest as it seeing something in the provided screenshot, like a malicious website or email, that instructs it to do something that the user does not want, and it complies. To avoid prompt injection risk, limit computer use access to trusted, isolated environments like a sandboxed browser or container.
Use blocklists and allowlists
Implement a blocklist or an allowlist of websites, actions, and users. For example, if you're using the computer use tool to book tickets on a website, create an allowlist of only the websites you expect to use in that workflow.
Send user IDs
Send end-user IDs (optional param) to help OpenAI monitor and detect abuse.
Use our safety checks
The following safety checks are available to protect against prompt injection and model mistakes:
- Malicious instruction detection
- Irrelevant domain detection
- Sensitive domain detection
When you receive a pending_safety_check, you should increase oversight into model actions, for example by handing over to an end user to explicitly acknowledge the desire to proceed with the task and ensure that the user is actively monitoring the agent's actions (e.g., by implementing something like a watch mode similar to Operator). Essentially, when safety checks fire, a human should come into the loop.
Read the acknowledge safety checks section above for more details on how to proceed when you receive a pending_safety_check.
Where possible, it is highly recommended to pass in the optional parameter current_url as part of the computer_call_output, as it can help increase the accuracy of our safety checks.
Using current URL
{
    "type": "computer_call_output",
    "call_id": "call_7OU...",
    "acknowledged_safety_checks": [],
    "output": {
        "type": "computer_screenshot",
        "image_url": "..."
    },
    "current_url": "https://openai.com"
}
Additional safety precautions
Implement additional safety precautions as best suited for your application, such as implementing guardrails that run in parallel of the computer use loop.
Comply with our Usage Policy
Remember, you are responsible for using our services in compliance with the OpenAI Usage Policy and Business Terms, and we encourage you to employ our safety features and tools to help ensure this compliance.